RaspPi-LMS + HiFiBerry + NAD-D3020 + Wharfedale-Diamond = Sweet Audio Rig
HiFi Setup
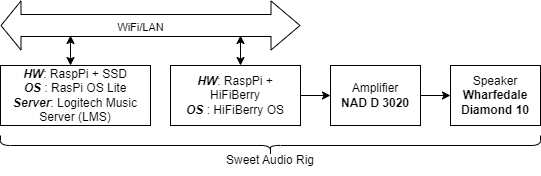
This audio rig is for audio enthusiast looking to step into the world of audiophile on a budget. This setup consists of four components: the music server (RasPi+LMS), the audio playback unit (RasPi+HiFiBerry), the amplifier (NAD D3020), and the speakers (Wharfedale Diamond 10). Currently, the entire setup can be put together for under USD 1,000.
Setting up the Lyrion Music Server (LMS)
Lyrion Music Server (LMS) (formerly Logitech Media Server) is open-source server software which controls a wide range of Squeezebox audio players including HiFiBerry. Lyrion can stream your local music collection, internet radio stations, and content from many streaming services (with and without subscriptions). In this section we will document the installation of LMS on a Raspberry Pi OS Lite.
INSTALLING RASPBERRY PI OS LITE
- Download and start the Raspberry Pi imager.
- Choose the OS type:
Raspberry Pi OS Lite (64 bit) - Choose the target SD card.
- From settings preconfigure avaialble options eg.
ssh creds, WiFi creds, hostname, etc.. This is essential for headless install. - Login using PuTTy using the preconfigured SSH user and update OS and install essential eg.
vim
INSTALLING UFW FIREWALL (OPTIONAL)
NOT NEEDED if unit is inside a firewall.
sudo apt install ufw- Before rebooting make sure you allow SSH:
sudo ufw allow 22 - Check the status
sudo ufw status
MOUNTING EXTERNAL SSD
- Find the block device name eg.
/dev/sdausing the commandlsblk - Create a partition (not necessary but highly recommended) using
fdisk:fdisk -lto list all partitions available.fdisk /dev/sdanfor creating a partition. For creating one Linux partition use the defaults.pprint the partition for checking.wwrite the partition to disk.
- Now you can see the block device for the new partition eg.
/dev/sda1usinglsblk - Create a
ext4partition:sudo mkfs.ext4 /dev/sda1 - Find the UUID of the partition:
blkid /dev/sda1 - Create a mount point:
sudo mkdir /media/wd220 - Create a fstab entry in
/etc/fstab:UUID=5abdf860-950b-40b8-8799-49f6ce70044c /media/wd220 ext4 defaults,auto,users,rw,nofail 0 0- FIXME document the options.
sudo mount -a
CREATING A SAMBA SHARE
Could not get a Public share to work. Write permission error from Windows. After trying out lot of ways, following seem to work for a Private share.
- Create the share directory:
sudo mkdir /media/wd220/Music - Change owner, group and permission to the user that will be a samba user say smbuser:
sudo chown smbuser /media/wd220/Musicsudo chgrp users /media/wd220/Musicsudo chmod 2775 /media/wd220/MusicThe 2 in the begining makes the folder sticky so users in the group “users” can write to the directory with their ownership.
- Install samba :
sudo apt-get install samba smb-client cifs-utils - Add the Windows group (eg. WORKGROUP) to the global option in
/etc/samba/smb.conf - Add the share folder to
/etc/samba/smb.conf:
[Music]
   comment = Public Music Folder
   path = /media/wd220/Music
   read only = no
   guest ok = no
   valid users = smbuser
sudo smbpasswd -a smbuserAdd the user as a Samba user. You are going to use this credential when accessing the folder from Windows.- Allow the SMB ports 139,445 in the firewall (if ufw enabled):
LOGITECH MEDIA SERVER (LMS) on RaspberryPiOS
This section documents the steps in installing Logitech Media Server for organizing Music files. Also, this installation was done on the Raspberry Pi OS that is already running OpenMediaVault (OMV) . So all filesystems are managed through OMV.
Followed the LMS part of Harald Kreuzer’s Blog. NOTE There is section in the blog about disabling the swap to increase the longetivity of the SD card. Worth looking into it.
Important steps are listed below:
sudo apt-get update && sudo apt-get upgrade -yfollowed bysudo reboot- Install LMS Server:
sudo apt-get install libsox-fmt-all libflac-dev libfaad2
sudo apt-get install libio-socket-ssl-perl
sudo apt-get install libcrypt-openssl-bignum-perl
sudo apt-get install libcrypt-openssl-random-perl
sudo apt-get install libcrypt-openssl-rsa-perl
wget https://downloads.slimdevices.com/LogitechMediaServer_v8.3.1/logitechmediaserver_8.3.1_arm.deb
sudo dpkg -i logitechmediaserver_8.3.1_arm.deb
NOTE Check the latest LMS distro available.
sudo ufw allow 9000- The server will now be accessible at
http://<IP>:9000/- NOTE you do not need to create the logitech account. You can skipt.
- FIXME Create the appropriate directory structure in OMV and configure that here.
- You can check these links (BegineersGuide, Survey, Organize4DJ-MP3Tags) to see some popular ways to organize folders for music.
- One popular choice is:
/<library>/<artist>/<album>/<tracks> - Organizing Classical Music is different (See BegineersGuideToClassical. A simple tagging (Tagged during ripping) reco from the guide:
- the folder strategy I am using now is:
/<lib>/<composer>/<CDalbum>/<tracks> - For Various artiests:
/<lib>/<VariousArtist>/<CDalbum>/<tracks> - Tag reco:
- Album tag for Work eg. “Beethoven Symphony no. 5 - Karajan”
- Artist tag for Composer eg. “Beethoven”
- Title tag for Movement eg. “Beethoven Symp 5 - 3- Allegro”
- the folder strategy I am using now is:
- You can remove all unnecessary plugins.
- It’s worth installing the
materialplugin which is a responsive plugin so the server will be accessible athttps://<IP>:9000/materialeven from a mobile.
AWS CLI
- Check this section for installing aws cli tools.
- Note, download the ARM version instead of the x86 version:
curl "https://awscli.amazonaws.com/awscli-exe-linux-aarch64.zip" -o "awscliv2.zip"
Setting crontab for syncing from AWS S3
00 03 * * 1 aws s3 sync --delete --profile srout s3://linode-vm01-bak /media/wd220/aws-S3/srout/linode-vm01-bak > /home/srout/logs/s3sync-linodevm01.log 2>&1
sudo ufw allow 139
sudo ufw allow 445
sudo systemctl restart smbdRestart the SMB daemon.- Now try accessing from Windows
Win+Rand entering\\[IP/hostname]/Music -
Some useful links: devconnected ComputingForGeeks ServerSpace
Setting Up HiFiBerry
(FIXME Content)
References
- Oracle, “Chapter 1 Introduction to the Solaris X Server.” Accessed: Oct. 02, 2023. Online