Understanding and using the X Window System
The explosion of the cloud computing market in recent years has resulted in cheap and widely available computing services. One subset of it is Infrastructure as a Service (IaaS), which offers essential compute, storage, and networking resources on demand, on a pay-as-you-go basis. Today, a consumer has access to Linux virtual machines (VM) in the cloud for less than five USD per month from any of the multiple cloud service providers including Linode, Amazon AWS, Digital Ocean, Google, Microsoft Azure, Vultr. But typically, these low-cost VMs are barebone headless servers (without monitor, keyboard, and mouse) running on low resources, for example, 1 shared CPU and 500 MB of RAM. Therefore, the stock Linux installation mostly does not come with any graphical user interface packages installed on it. In most use cases, these VMs are running services that do not require any graphical output, but there are times an user may require to view an output like viewing a graphical plot from your Python program.
In this blog, we will demonstrate two methods of viewing graphical outputs from a program running on the server on a remote desktop. But before we do that, it is worth spending some effort to understand the common architecture of a graphical window system in a Linux environment.
The X-Server Architecture
The graphics window system in Linux is based on X Window System, called X for short, that was first developed at MIT in 1984 of which X Version 11 (X11) is the version in use today which was first released in 1987. X Windows is based on client-server model where, a X server program runs on a computer with graphical interface hardware that communicates with various client programs over a network protocol.
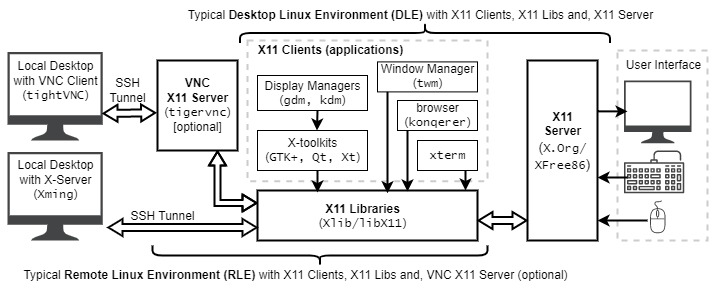
Above figure shows a typical Linux desktop running X11 Server that acts as a bridge between the user and the client program. X11 accepts user input (keyboard, mouse), transmits it to the client program, receives the output from the client program, and displays it on the output device (monitor). The X11 Server communicates with the client over a network protocol (TCP) making it very portable; it isolates the client from the underlying hardware. Additionally, the communication protocol between the server and the client is network transparent; the client and the server may run on the same machine or on different machines, even with different architectures and operating systems. And communication can be done securely over the Internet through an encrypted connection like SSH.
Client programs (xterm, konqerer, window managers; twm and display mangers; gdm,kdm) communicate with the X server using a device-independent library called Xlib, the linux package is called libX11. But most applications use other libraries that interact with Xlib functions to provide widget toolkits such as, X Toolkit Intrinsic (Xt), Athena widget set (Xaw), Motif, GTK, Qt and so on.
Linux servers without IO devices (Monitor, keyboard, mouse), also known as headless servers, do not have any X server installed on them. However, you can still run the X client application on them and view the output on remote desktops or workstations. As shown in the figure, a desktop running an X server, for example, a windows desktop running Xming, can connect securely over the Internet using SSH, which can also forward all the X11 outputs from the Linux server to the remote desktop. Another way is to install a VNC server, like tigervncserver, along with a desktop manager like Gnome, KDE, or Xfce on the Linux server. Then install a VNC client, like tightVNC on a Windows desktop, and connect to the remote server through a secure SSH tunnel. This method will give you access to a full desktop but will of course consume more resources on the client (linux server). There are various other ways to run X applications and view the output on a remote desktop, but in the next two sections we will explain in detail the above two methods with an example to demonstrate them.
Forwarding X over SSH
If you do not need a full-blown GUI desktop like Gnome or KDE and want to run single X applications, the simplest way is to run the application with X11 forwarding from the remote client. In this example, we will show a remote barebone server running Ubuntu 22.04 forwarding GUI application (X applications) through an SSH tunnel to local Windows desktop running a X-server.
Four things need to be in place for X11 forwarding over SSH to work: The client (Linux server) should be setup to forward X11, the local X-server should be setup to allow X11 forwarding, the Linux server should be setup for X11 authentication, and, a local X-server should be running to accept the X11 requests from X11 client running on the Linux server.
Make sure the X11Forwarding option in /etc/ssh/sshd_config is set to yes. Make sure the xauth program is installed and running on the server for X authentication. Typically, it is installed due to atleast one X application installed on the system.
Download an X-server for your Windows desktop and launch the X-server. In this example, we will demonstrate using a popular X-server for Windows called Xming. Once the X-server is running, it is now ready to accept X request from the remote Linux server. In this example, we will use the popular Windows application PuTTy to forward the X over SSH. Open PuTTy and enter the host name or IP in the host name field. Then click on the option X11 under the category SSH in the Connection menu. Click the option Enable X11 forwarding. Now, click the Session option again and give a name to this session and save for future use. Click ‘Open’ to log into the server with your user credentials. After successfully loging in, SSH will automatically set the environment variables DISPLAY and AUTHORITY. It will also create a ~/.Xauthority file if doesn’t exist. Now you can run X applications (e.g. xterm, xclock, etc.) and the application should display on your local Widows desktop.
On a Linux desktop already running an X-server, the X11 forwarding is enabled by a simple -X option to the ssh command from a terminal:
$ ssh -X user@remote-linux-serverVNC Server
If you want to run a full desktop environment like Gnome or KDE then you need a special X-server that can interact with a remote user (keyboard, mouse, and monitor) over the network. One such popular server service is Virtual Network Service VNC. You need three things in place, a desktop environment and a VNC server running on the Ubuntu 22.04 Linux server, and a VNC client running on the remote desktop. In this example, we will use a light-weight XFCE desktop environment, tigervnc VNC server which is available in most Linux distros, and tightVNC client running on the remote windows desktop.
Install the XFCE desktop environment and the VNC server
$ sudo apt install xfce4 tigervnc-standalone-serverIn most linux distros, the package is called tigervnc-server. After installing the server, a user needs to create a password.
$ vncpasswdThis will create a directory ~/.vnc with all config, log and process files for the VNC server. If it does not exist, create a config file ~/.vnc/config with some example parameters.
geometry=1024x768
localhost=no
The geometry options set the xfce desktop size on your remote desktop. In some default installation, the vncserver starts with the localohost=yes option that will not accept any connections from outside.
Alternatively, you can configure the global default parameters in the /etc/tigervnc/vncserver-config-defaults file. The parameters in that file are applied to any user unless otherwise overridden by a user’s ~/.vnc/config file.
The TCP port with which the VNC server communicates is determined by the display number with which the server is started. If no display number is defined, the server will use the lowest available one. VNC connections take place on port 5900+ display. In this example, we will use a display number of :1 therefore, you will connect to remote port 5901. In most instances, you may have to open the port in the firewall. You can use the firewall-cmd command:
$ sudo firewall-cmd --add-port=5901/tcp –permanent
$ sudo firewall-cmd enable
$ sudo firewall-cmd reload
Now you can start the server:
$ vncserver :1Now you can connect from the remote desktop using a VNC client. tightVNC is a popular Windows client. Start the client and enter in the Host Name field of the client where Public IP is the IP address of the server running tigerVNC. Now you should be able to interact with the XFCE desktop environment remotely.
The default VNC connection is not encrypted. To secure your passwords and data, you can tunnel the VNC traffic through an SSH connection to a local port. PuTTY for Windows can be used to create an SSH tunnel. Start PuTTY enter user@IP-Address as the host name, with user being the user on which the VNC server was configured. Open the Connections menu and select Tunnels from the SSH section. Enter 5901 as the source port and IP-Address:5901 as the destination. Under Designation, select Local and Auto. Click Add to add the tunnel specification to the PuTTY session. Make sure to save the session. Now you can click Open to open the connection to the Linux server, provide user credential to login, and now the secure tunnel should be active. To connect to the XFCE session, open the VNC client (eg tightVNC) and enter localhost:1 as the host name to interact with the XFCE session over the secured SSH tunnel.
Troubleshooting
After starting the vncserver run sudo netstat -plutn and if it runs on 127.0.0.1:1 or ::1 then it runs on localhost and cannot be accessed from outside. Make sure ~/.vnc/config has localhost=no.
In order to check if the port is open, in a Windows command window, type the command netstat -ano | grep 5901 and you should get an output something like:
TCP 127.0.0.1:5901 0.0.0.0:0 LISTENING 7856
TCP [::1]:5901 [::]:0 LISTENING 7856
References
- Oracle, “Chapter 1 Introduction to the Solaris X Server.” Accessed: Oct. 02, 2023. Online
- Oracle, “Understanding the X Server Process - Oracle Solaris 11.1 Desktop Administrator’s Guide.” Accessed: Oct. 03, 2023. Online
- Stackexchange, “How to forward X over SSH to run graphics applications remotely?”, Accessed: Oct. 03, 2023. Online
- University Information Technology Services, “Use X forwarding on a personal computer to securely run graphical applications installed on IU’s research supercomputers.” Accessed: Oct. 03, 2023. Online
- SourceForge.net, “Xming X Server for Windows download.” Accessed: Oct. 03, 2023. Online
- Borisenko, “A Brief intro to X11 Programming.” Accessed: Oct. 03, 2023. Online
-
Adam McPartlan, “Easy SSH Automation Linux Journal.” Accessed: Oct. 03, 2023. Online - O’Reilly, “1 An Introduction to the X Window System - X Window System User’s Guide for X11 R3 and R4 of the X Window System ” Accessed: Oct. 03, 2023. Online Book
- “X Window System protocols and architecture,” Wikipedia. May 21, 2022. Accessed: Oct. 03, 2023. Online
- “Xlib,” Wikipedia. Mar. 19, 2023. Accessed: Oct. 03, 2023. Online
- “An introduction to X by The Linux Information Project (LINFO).” Accessed: Oct. 03, 2023. Online
- Srinivasan, “JUST AIX: Create/rebuild a new .Xauthority file,” JUST AIX. Accessed: Oct. 03, 2023. Online